About Stigan
Free 2 year parts warranty
All of our parts are covered by an industry leading two year parts warranty.
Unlimited Miles
Our warranty comes with no mileage restrictions. You can drive non-stop for two years and still be covered by our warranty.
Shipping is Covered
In the rare case a turbocharger needs to be replaced, the warranty covers shipping of the new turbocharger to the customer. Furthermore, the warranty will cover return shipping of the original turbo back to the distributor.
Distributors
Warranties are administrated at the distributor level. If you have any questions regarding Stigan warranties, please contact the distributor which you ordered your part from. All of our distributors are listed below.


Warranty
two years. free. unlimited mile. industry leading.
Stigan Turbochargers are known for quality and performance. We stand behind our products with a free 2 year unlimited mile warranty. Our warranty is the best in the business. If there happens to be an instance where a turbocharger needs to be replaced, the warranty covers the shipping to and from the customer. We can provide this level of warranty because we know it will rarely get used. Stigan turbochargers are made to outlast!
Stigan warranties are handled at the distributor level. If you have any questions in regards to a warranty, please contact the distributor from where you purchased your Stigan auto part. We only partner with the best auto parts companies. All of our distributors' customer service departments are more than prepared to handle any questions you may have.
Yes, Stigan Turbochargers are top of the line auto parts that should last the lifetime of your vehicle. However, just like any car part, a Stigan Turbocharger needs to be properly installed. our warranty does not cover labor. Stigan and our distributors cannot be held responsible for improper installation. If the below guidelines were not followed when you or your mechanic installed the turbo, your warranty may be denied. These guidelines are also sent out in every Stigan Turbocharger order.
turbocharger removal and installation guidelines
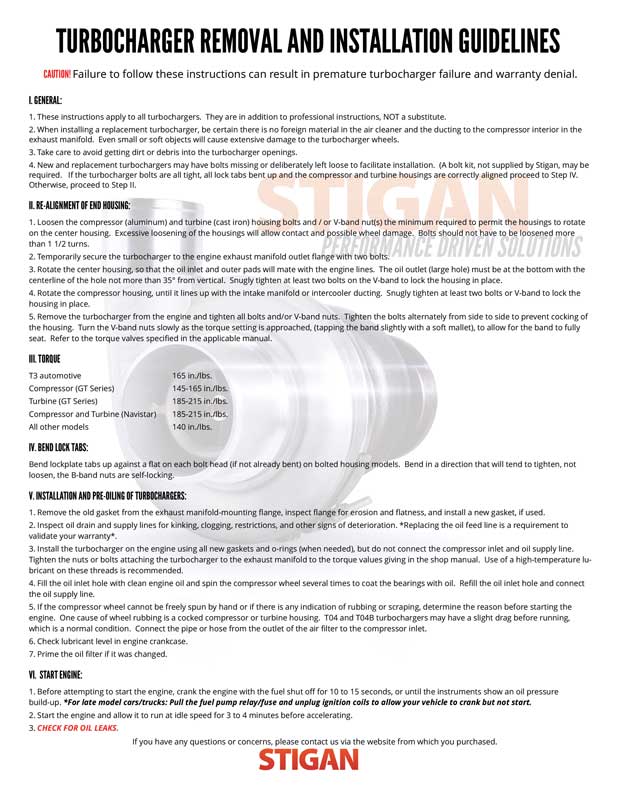
I. GENERAL
1. These instructions apply to all turbochargers. They are in addition to professionl instructions, NOT a substitute.
2. When installing a replacement turbocharger, be certain there is no foreign material in the air cleaner and the ducting to the compressor interior in the exhaust manifold. Even small or soft objects will cause extensive damage to the turbocharger wheels.
3. Take care to avoid getting dirt or debris into the turbocharger openings.
4. New and replacement turbochargers may have bolts missing or deliberately left loose to facilitate installation. (A bolt kit, not supplied by Stigan, may be required.) If the turbocharger bolts are tight, all lock tabs bent up and the compressor and turbine housings are correctly aligned proceed to Step IV. Otherwise, proceed to step II>
II. RE-ALIGNMENT OF END HOUSING
1. Loosen the compressor (aluminum) and turbine (cast iron) housing bolts and/or V-Band nut(s) the minimum required to permit the housing to rotate on the center housing. Excessive loosening of the housings will allow contact and possible wheel damage. Bolds should not have to be loosened more than 1 1/2 turns.
2. Temporarily secure the turbocharger to the engine exhaust manifold outlet flange with two bolts.
3. Rotate the center housing, so that the oil inlet and outer pads will mate with the engine oil lines. The oil outlet (large hole) must be at the bottom with the centerline of the hole not more than 35 degrees from vertical. Snugly tighten at least two bolts on the V-band to lock the housing in place.
4. Rotate the compressor housing, until it lines up with the intake manifold or intercooler ducting. Snugly tighten at least two bolts or V-band to lock the housing in place.
5. Remove the turbocharger from the engine and tighten all bolts and/or V-Band nuts. Tighten the bolts alternately from side to side to prevent cocking of the housing. Turn the V-Band nuts slowly as the torque setting is approached. (tapping the band slightly with a soft mallet), to allow for the band to fully seat. Refer to the torque values in applicable manual.
III. TORQUE VALUES
T3 Automotive - 165 in./lbs.
Compressor (GT Series) - 145-165 in./lbs.
Turbine (GT Series) - 185-215 in./lbs.
Compressor and Turbine (Navistar) - 185-215 in./lbs
All other models - 140 in./lbs
IV. BEND LOCK TABS
Bend lockplate tabs up against a flat on each bold head (if not already bent) on bolted housing models. bend in a direction that will tend to tighten, not loosen, the B-band nuts are self locking.
V. INSTALLATION AND PRE-OILING OF TURBOCHARGERS
1. Remove the old gasket from the exhaust manifold-mounting flange, inspect flange for erosion and flatness, and install a new gasket, if used.
2. Inspect oil drain and supply lines for kinking, clogging, restrictions, and other signs of deterioration. *Replacing the oil feed line is a requirement to validate your warranty*.
3. Install the turbocharger on the engine using all new gaskets and o-rings (when needed), but do not connect the compressor inlet and oil supply line. Tighten the nuts or bolts attaching the turbocharger to the exhaust manifold to the torque values given in the shop manual. Use of a high-temperature lubricant on these threads is recommended.
4. Fill the oil inlet hole with clean engine oil and spin the compressor wheel several times to coat the bearings with oil. Refill the oil inlet hole and connect the oil supply line.
5. If the compressor wheel cannot be freely spun by hand or if there is any indication of rubbing or scraping, determine the reason before starting the engine. One cause of wheel rubbing is a cocked compressor or turbine housing. T04 and T04B turbochargers may have a slight drag before running, which is a normal condition. Connect the pipe or hose from the outlet of the air filter to the compressor inlet.
6. Check the lubricant level in engine crankcase.
7. Prime the oil filter if it was not changed.
VI. START ENGINE
1. Before attempting to start the engine, crank the engine with the fuel shut off for 10 to 15 seconds, or until the instruments show an oil pressure build=up. *For late model cars/trucks: Pull the fuel pump relay/fuse and unplug the ignition coils to allow your vehcile to crank but not starts.
2. Start the engine and allow it to run at idle speed for 3 to 4 minutes before accelerating.
3. Check for oil leaks